


Table of contents
- Introduction
- What is Git?
- Step 1: Using Git
- Step 2: Creating Work Directory and Initializing it as a Git repository
- Step 3: Adding files to the staging area
- Step 4: Git Commit; Taking the Project Snapshot
- Step 5: Git Branch; Creating Git branches
- Github
- Step 4: Push the local rep to Github
- Step 5: Git pull: Pulling changes from your remote project repository to the local repository
- Reminder
- Conclusion
Hello! welcome to my article🤗. This article focuses mainly on the fundamentals and basics on how to use Git and GitHub. We will discuss Git and Github, various git commands, and their uses in detail. You will learn how to create, push, and pull a repository.
Introduction
Imagine you have a time machine that gives you the ability to travel back and forth in history, the awesome thing about having the time machine would be the ability to change some things that happened in the past, isn't this great😊! Let me share a personal experience;
over the weekend I was in transit to attend a tech event that happened in my community, along the process of boarding the transport to get to the venue I accidentally lost my phone. Then it dawned on me to imagine if I have a time machine to go back in time and track my progress from my home, hahaha 😂.
"This is where Git comes in ⬇️"

"Irrespective of where you are in your career, you can learn how to use Git and GitHub, which are crucial tools for developers".
Let's get started🚀🚀
What is Git?
Git is a distributed version control system, that enables you to track and maintain working progress in a project.
 Don't be confused, let's break things down. Let's look at Git as a;
- Version control system means that Git is a tool/system that keeps track of various versions of your project while working on personal projects or team projects.
- Distributed version control system means that with Git every collaborator (developer) working on a team project has a local copy (repository)of the project on his or her personal computer.
Why do we use Git?
Git has over time become an industry standard for development. With Git you can;
- You can roll back to the previous version of your project and undo your mistakes.
- With Git you can see all the changes that the project you are working on has gone through.
- Whenever you are doing a big project that has many features, you can use Git to work on different features separately without causing conflict with other features in the project.
The ability of Git being able to snapshot your code or project files at a specific time is incredibly helpful as your project or codebase grows and you may have to reference previous versions of it.
Git Pattern
There are four patterns/structures while working with Git, this includes; working directory, staging area, local repository, central repository
- Working directory: This is the location (folder) on your computer where you create and edit project files.
- Staging Area: The staging area is also known as the index. To track the changes made to your files (project) You must first place your project in the staging area before committing.
- Local Repository: Local repository is where you first commit modifications/changes of your project before pushing (sending) the changes to the central repository (on Github). Your local repository is only visible and managed by you which in turn is transferred to the central repository where every member contributing to a project can then see your commits and activities.
Without pushing your commit to the central repository no one else can manage or contribute to the project.
- Central Repository: The central repository is the platform where you host your project on a central server (in this case it is GitHub). The central repository is a copy of the project of which every team member contributing to a project can create a local repository of on their computer.
Don't worry too much about this, you'll get to know them better when we explore the Git States. 🕺🏾🤸♀️🤸♀️💃🏻
Git States
Files in a Git repository go through three states (stages) before being regarded as version controlled with git. These states are Staged, Modified, and Committed. Let's take a brief look at these stages;
- Modified means that you have changed the file but have not committed it to your database yet.
- Staged means that you have registered a file in its current version to go into your next git snapshot.
- Committed means that the data and modifications (changes) you made to the file are safely stored in your local database.

Note; Repo is a short word for Repository
These Git States will guide our work with git. Now that you know what Git is and what is it used for, it is time to start working with git!

Step 1: Using Git
Downloading Git
First of all, you'll need to download and install Git's tools on your computer.
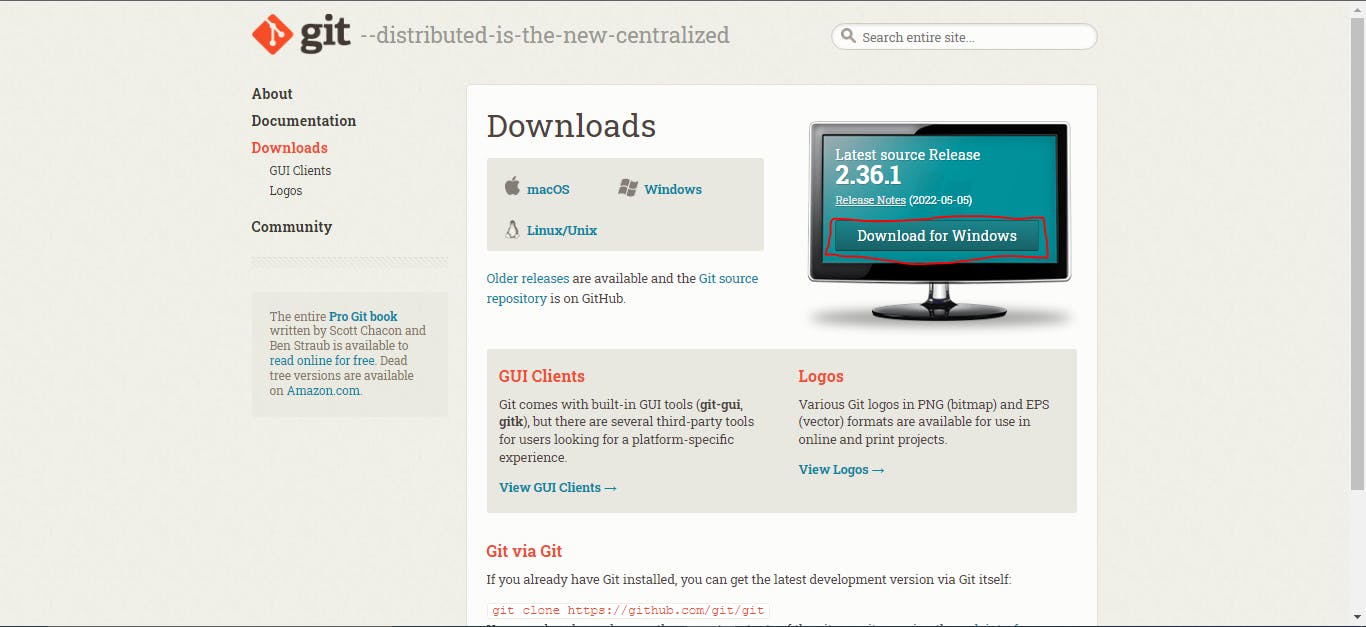
For Windows and Mac Operating System To download Git to your computer visit the Git website to download the latest version of Git for your operating system.
Please, note in my case I am using Windows Operating System.
For Ubuntu users, use the command below
$ sudo apt-get install git
Git installation and git --version
Git Installation
After downloading Git on your computer; like other software program installation, the installation of Git follows the same process. Upon installation dialogue prompt, click on next, leaving every setting at default. Let's proceed to confirm the installation.
Git --version
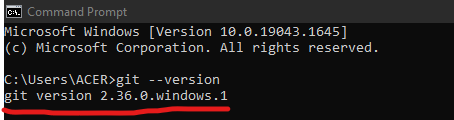
Once the installation is complete, you can confirm the installation by checking the Git version that you installed, to check the git version you installed on your computer follow these steps;
- Go to your terminal or command prompt/CMD (on windows)
- Run the command below in the terminal/CMD to see the version of the git that is installed.
git --version
If you see something like the image below, it means you have successfully installed git on your computer.
Do you get stuck while installing Git? For detailed installation, you may check this post.
There you go! you just installed Git on your computer. We're about to have some fun.

Git config: Git Configuration
After successfully installing Git on your computer, it is important to set up/configure your Git account (with your username and email). This is essential because Git will associate your details with the changes you made to your project, let's do this!
To configure Git open your terminal/CMD input the following command and replace it with your desired "username" and "email"
git config --global user.name "YOUR_USERNAME"
Edit the command with your preferred username.
git config --global user.email "YOUR_EMAIL_ADDRESS"
Edit the command with your preferred email address.
Check your Git config by using git config --list command
git config --list
This is the basics of what you need to configure your Git. Let's look at the Git States.
Step 2: Creating Work Directory and Initializing it as a Git repository
Creating Work Directory
Working directory simply refers to the folder that holds your project files. To create a working directory; Create a folder and name it "Git and GitHub tutorial" or anything you want. You may add some files to the folder, in my case I have some images in my folder.
This way you've created your working directory, let's get to the interesting part by calling git to start monitoring our working directory.
Git int: Initializing Work Directory with Git
Although Git is on your computer, it will not track or monitor any change in your project until you tell it to come and start doing its job. To call Git we need to use the git init command. The git init command creates a new Git repository. It can be used to convert an existing, unversioned project to a Git repository or initialize a new, empty repository.
To initialize a Git Repository
- Right-click inside the folder and select Git Bash here.
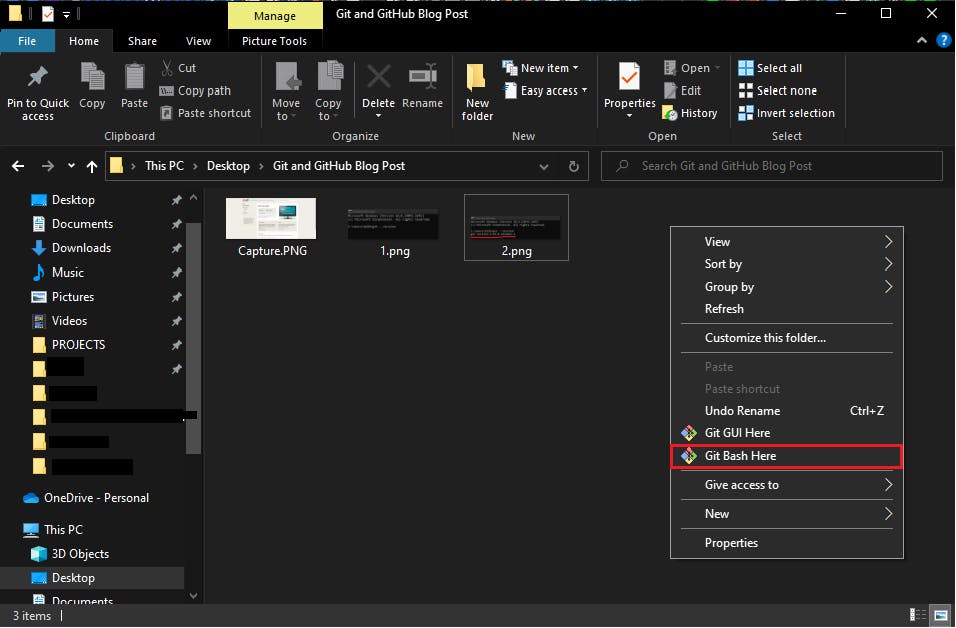 Git bash will open up with the path to your project folder as shown in the image below.
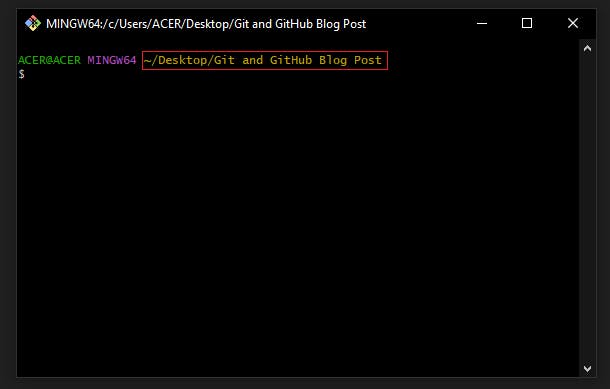
The red box in the image above indicates the path to your project folder (working directory).
To initialize the working directory as a git repository, we'll the git init command:
git init
Input the command above and press enter key on your keyboard. You should see something like this:

Apparently, most Git commands are available within an initialized repository, therefore it is an essential command you'll run in a new project. Executing
git initcreates a .git subdirectory (additional folder) in the current working directory, which contains all of the necessary Git metadata for the new repository. You don't have to worry about the subfolder now, it contains the necessary files Gits needs to keep records and ignored files.
Now you've called git to start monitoring the Project folder (working directory). Let's understand the message you get.

- 1 indicates the path to the working directory (folder) I created.
- 2 is the
git initcommand to initialize the working directory as a git repository.- 3 is the message from Git which tells us that the working directory has been initialized as a git repository but it's empty. The repository is empty in the sense that no files have been added to the staging area.
Step 3: Adding files to the staging area
li; To see the list of files in the working directory
Before adding files to the staging area, you might want to check the list of files that are in your working directory by using the ls command.
ls stands for list, this command will list the files that are in your working directory.
In my working directory, I have the files that are listed as seen in the image above. You don't have to worry if you don't have any files in your working directory, you can go ahead to create one through the normal way you know or by using the touch file_name.extension command.
touch file_name.extension
Let's see how it is done, say for example you want to create an Html file using the command, we'll do it this way.
touch index.html
This way you created a file from the cmd, and you can "ls" to see the file you just created.
Git Status: Checking the State of the Files in the Local Repo
One more thing you might want to do before adding files to the staging area is to see the status of your git repository.
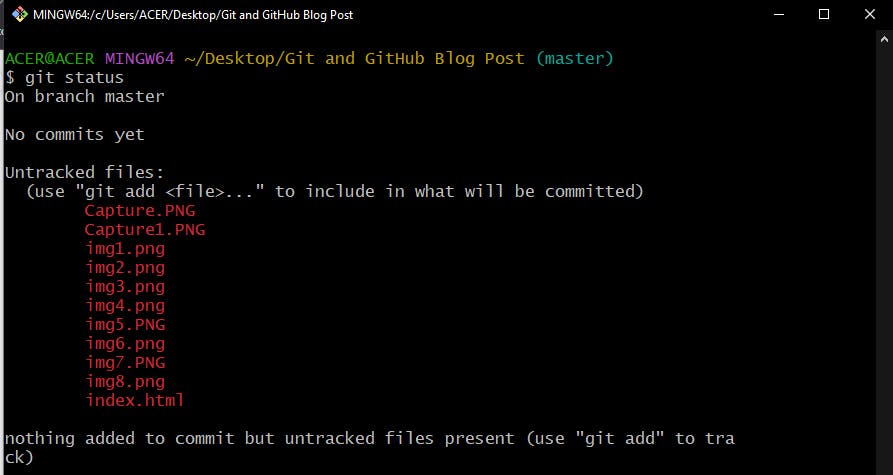
To do this we'll use the git status command which tells us the status of the project at the time of using the command.

Has seen in the image above, Git status command shows the situation of my local repo snapshots, which means that;
I'm on the master branch, we'll learn about branches later.
I haven't made any commit yet, we'll learn about commit soon.
Also in red, Git list all the files (eleven files) in my working directory and tells me that files are not being tracked by Git. Git doesn't know about these files. It means that if I make any changes in these files, Git will not be able to track those changes and undo those changes that I made to the file.
Therefore, before you can commit files to track the changes you need to add them to the staging area first.
Also, you will realize that git is intelligent enough to have given me a suggestion on how I can add files to the staging area.
Let's dive into how to add the files to the staging area using git add.
Git add; Adding Files to the Staging Area
Let's add the files to the staging area so that Git will know the files. In order to add files to the staging area and for git to know the files, it can be done in three ways this includes adding all the files at once, adding all files with the same extension or we can add specific files individually;
- To add individual/specific files to the staging area we'll use
git add file_namecommandgit add file_name.file_extension - To add a group of files with the same file extension we'll use
git add *file_extensiongit add *file_extension - To add all the files in your folder to the staging area at a go use
git add .git add .git statuscommand.

Step 4: Git Commit; Taking the Project Snapshot
Git Commit
Committing is the process in which the snapshot of the project at a point in time is stored in the local repository database. By committing, you tell git to take a snapshot of your project status at a point in time.
You can commit your project at any point in time but, most time you want to make a commit when you make a noticeable change to the project you're working on. This is done so as to be able to roll back to the previous version of the project in case an unforeseen circumstance occurs.
Your work is stored locally when you create a commit, and you can simply roll back to earlier commits if something unfortunate happens to your project in the future.
To make a commit we'll use the git commit -m "your_commit_message_" command.
git commit -m "your_commit_message"
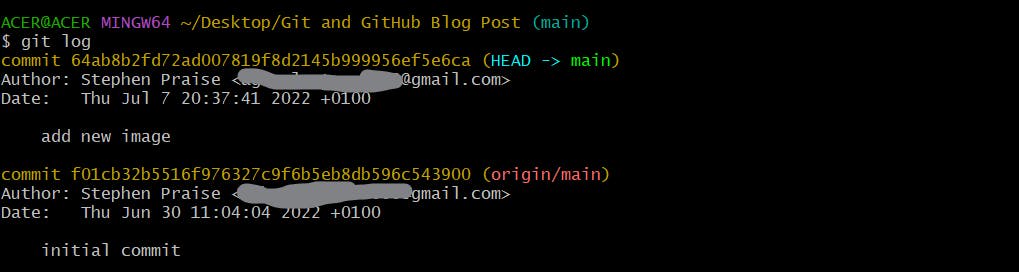
Git log; To see your commit history in Git
This command shows the commit history for the current repository we'll use the git log command;
git log
A git commit can be likened to a register entry book, the git commit consist of the following information.
- Your name and email (remember we configured git earlier)
- The date and the time of when the commit was made.
- And hashcode (hash) of the commit, the hashcode is unique for each commit you make.
- The commit message that I added to understand the change I made. Check the image below to see my commit for the current repository.
Up until this time, you are the only one working on your project, and Git is been used to save and track it locally. This is not good enough because, if you lose all of your data due to unforeseen circumstances your work might be gone. Therefore GitHub can be used to host your project and to collaborate with other developers this way the unforeseen circumstance and the fear of losing your project file will be avoided.
Step 5: Git Branch; Creating Git branches
Git branch
Remember we discussed that Git has the superpower to create identical copies of a project and it allows us to work on separate versions of the project; The version of the project can be addition of different features. However, the Git branch can be achieved through branching and by using the git branch branch_name command.
First of all, to see the branches that are in your project use the git branch branch command;
git branch
The image below shows that I have only one branch "main"

In cases where I need to work on a new feature without having to disrupt the main branch then I can achieved this by creating a new branch.
To create a new branch we'll use;
git branch "branch_name"
This will create a new Git branch and our whole project will get copied into that branch. Now when we check branches in our project by using git branch command We'll see a new branch I created which I named "new_idea". Check the image below;

However, in the image above you'll see the asterisk(*) is still on the main. It means that I am still working on the main branch of the project and not on the new branch I created (new_idea). To work on the new branch we need to checkout to it.
To do so we'll use the git checkout "branch_name"
git checkout "branch_name"
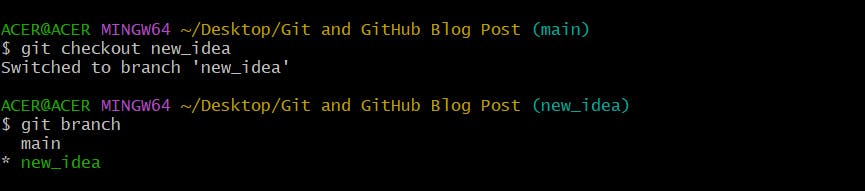
As you can see from the image above, the branch has been switched to the new branch I created, and the asterisk(*) is now on the "new_idea" branch.
Git branching is a very powerful feature and so it is an important one to know.
Let's take a look at GitHub
Github
Github is a Cloud-based hosting platform for version control and collaboration. It lets you and others work together on projects from anywhere. With GitHub, you can host your project in the repository and showcase your skills and learning.
##Step 1; Using GitHub Login to your GitHub account or SignUp The first step to working with GitHub is to create an account or login into your GitHub account. If you already have an account you can proceed to Sign In, if you don't have an account don't worry it is very easy for you can SignUp to create an account.
##Step 2: Creating a new repo on GitHub To create a remote repo on GitHub:
- Log in to your GitHub account
- On the GitHub home page click on the “+” sign next to your profile picture, in the top right corner of the home page (as shown in the image below) there you'll find the option to create “New repository” click on it;

- Name your repository, and give a description of what your repository is about (this is optional).
- Choose if you want to make the repository public or a private repo (only you and the people you give access to the repository can see a private repository).
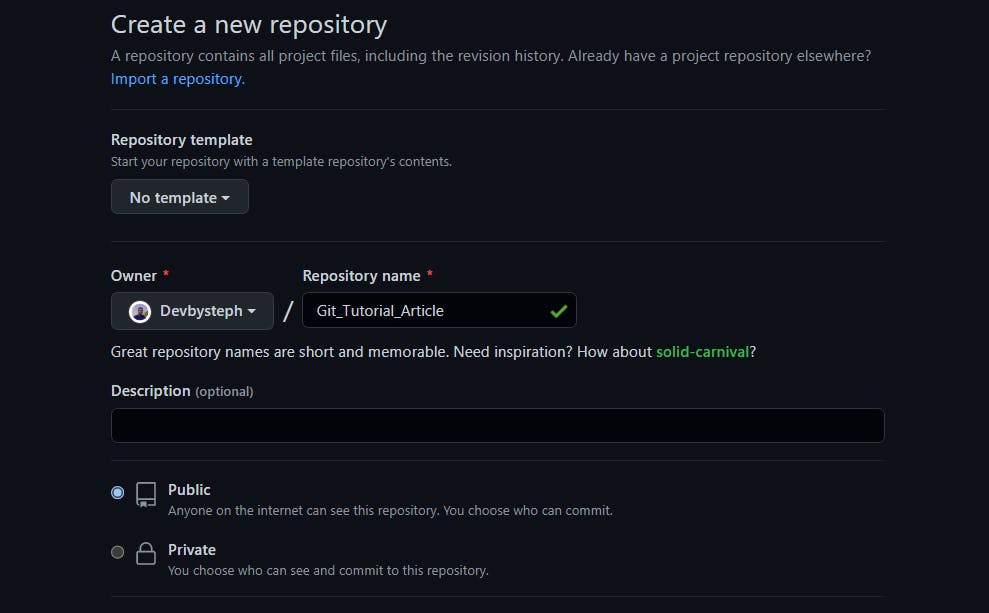
- You can add a readme (A ReadMe file on GitHub gives an overview of your project at a glance), also you can add a license if you want (consider reading about it).
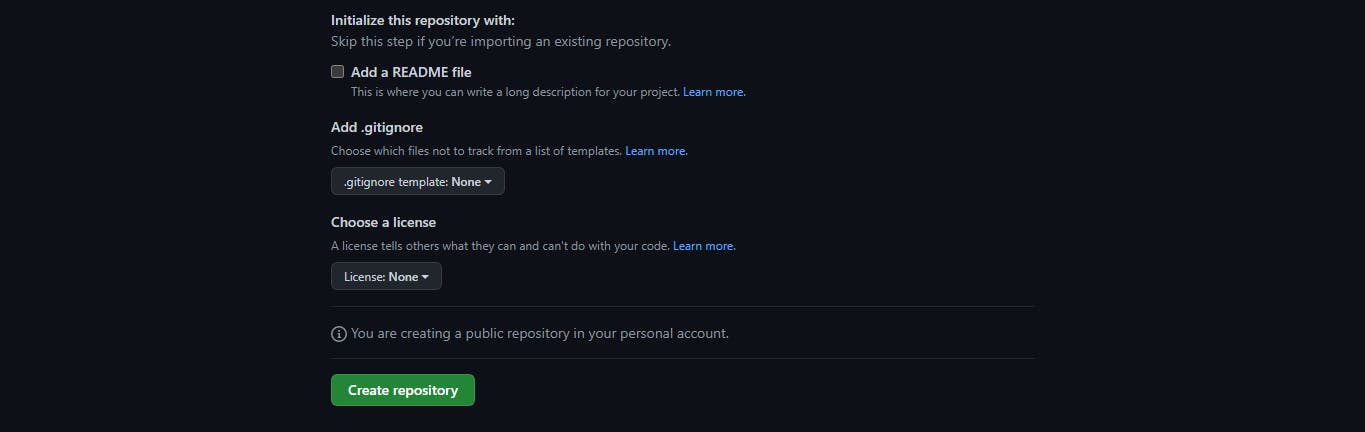
- When you're done filling out the information, press the 'Create repository' button to make your new repository.
Voila! you just create a remote repository on GitHub, this repository will host your project remotely. Now let's connect the local and remote repo.
##Step 3
Git remote add origin URL: Connecting your local repo to the remote repo
After clicking on "create repository" you'll be taken to a page as shown in the image below;
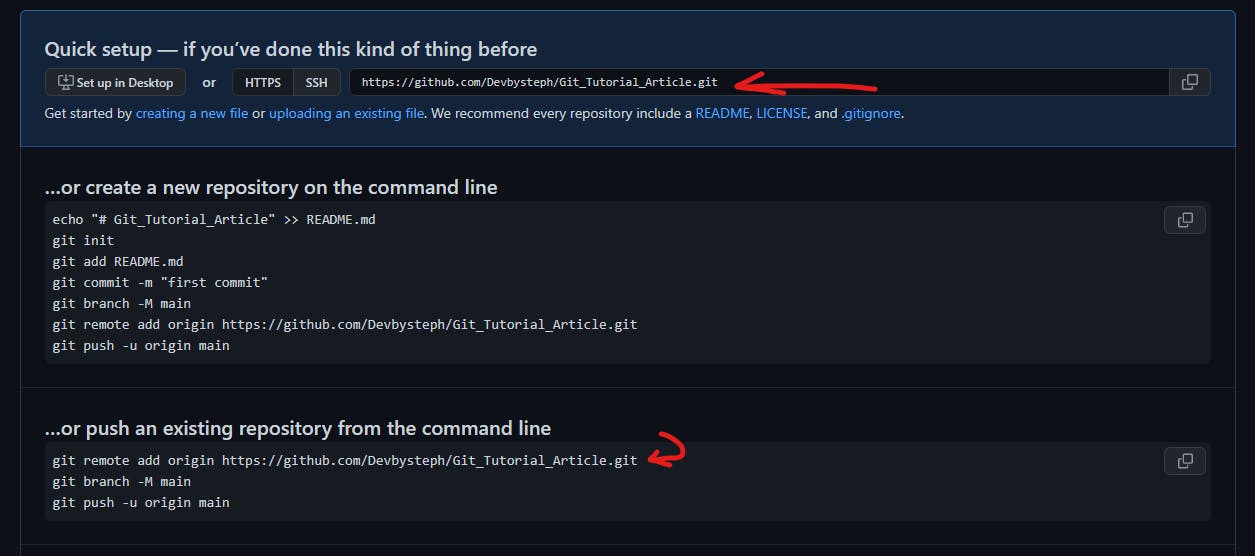
These are basically options suggested by GitHub, which include if you want to create a new repo from scratch or if you want to add a repo you have created locally. In this case, since I've already created a repo locally, I will want to follow the second option which suits my case best which is to push an existing repository from the command line.
However, let's break things down: Connect the local repository with the remote repository. To do this;
- Go to the Gitbash terminal and use this
git remote add origin yourRemoteRepoUrlto connect local with remote. Now copy the link to the remote repo on GitHub and input it to the command.
git remote add origin <remote repo url>
Git remote -v
The git remote -v show the URL to the remote repo you are connected to. To check if the remote repo has been successfully connected use the command below;
git remote -v

The image above shows the URL to the remote repo which indicates that the local repo has been linked with the remote repo.
When it is confirmed that the remote and the local repo have been connected, it's time to push files to the remote repo on GitHub. To do so we'll follow the step below;
Step 4: Push the local rep to Github
Git push origin main
The git push origin main command means that we are pushing the local repo branch to the main branch of the remote repo we created previously.
git push origin main
If this is your first time pushing to GitHub from the command line, you might be prompted to log in with your GitHub username and password.
If you go to the remote repository on the GitHub page and refresh it, you'll see the files that were on your system locally have been uploaded to the GitHub repository, see the image below.
Step 5: Git pull: Pulling changes from your remote project repository to the local repository
Pulling changes from your remote project repository to the local repository, we'll use the git pull origin main.
git pull origin main
This means that we are downloading changes from the origin's main branch to the local repository.
In my opinion, at this stage of development you'll find yourself using most of the commands that we've discussed in this article. Check the Reminder below
Reminder
It fine, we all get stocked at a point in time. Always remember this flow (the image below) whenever you are working with git.

Conclusion
It's been a very long ride, take a deep breath
The article introduces you to Git and GitHub and the fundamental concepts that are required to get you started with using Git and GitHub. At this stage, it is important to keep your attention on things that are essential to get started and avoid becoming overwhelmed by the lengthy list of features and commands.
As you proceed on this journey you'll get to learn more commands and features to cater to your need at a particular point in time. Also, always be sure to leverage and take help from google, there are many useful resources on the internet to learn more about Git and GitHub.
In the next article, we'll look at how to send a pull request, merge branches and resolve conflicts.
There are many other git commands, you will get to understand and figure out many of them as you progress in your development journey. Here is a cheat sheet of Git commands you can check out.

If you have read this far, I hope you found this article educating and worth reading. Be sure to like, comment, and share this article. Feedbacks are strongly encouraged. Let me know your thoughts concerning the piece. Let's connect on Twitter, LinkedIn, Instagram.
Clap 👏 if you find this blog helpful. See you at the next one! Don't forget to share and share your feedback.
Stay safe, and keep building 🎈